Matt's Canon EOS M50 Guide
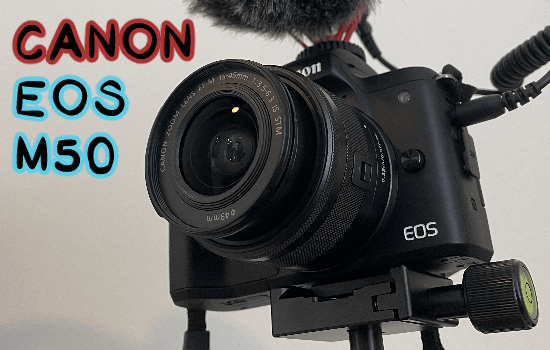
This is my "quick reference" guide for the Canon EOS M50 DSLR camera.
(If that seems unexpected from me, it is! Read the ending for an explanation.)
Disclaimer: I don't know what I'm talking about. This is my first semi-pro camera and all these concepts are new to me. What this guide covers & recommends are biased towards my primary use cases: amateur photography and YouTube videos.
That's never stopped me before! Let's dig in:
📸 Getting started
Let's go through some basics & general properties of the camera.
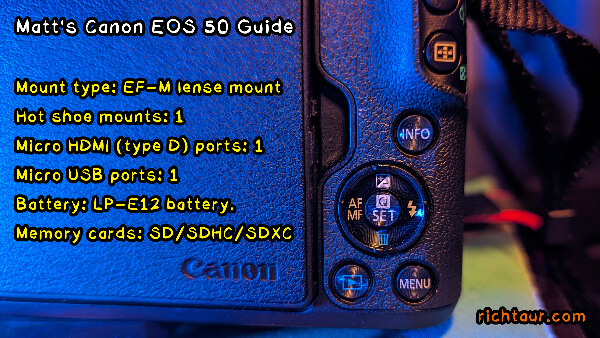
Properties
Here's some general stuff I care about. For more see the tech specs (PDF).
- This camera has an EF-M lense mount (adapters are available).
- It is topped with a hot shoe mount (for lights, mics, etc.).
- It has one Micro HDMI (type D) port.
- It has one Micro USB port.
- It uses an LP-E12 battery.
- It supports SD/SDHC/SDXC memory cards.
A note on memory cards: there appears to be no memory upper limit. I use a 512GB card, but some folks recommend using multiple smaller memory cards (to help with organization). Sounds smart!
Terminology
Here are a few fundamental photography terms it's good be familiar with:
Aperture
Also called f-stop, this determines how much light is let in.
- A low aperture (e.g. f1) means more light is captured.
- A high aperture (e.g. f8) means less light is captured.
In general when it's bright & sunny, you might want a high aperture. When it's dark or nighttime, you might want a low aperture. It's up to you!
Shutter speed
The shutter is what opens & closes to allow light into the aperture so a photo (or frame) can be captured. For example, 1/60 would mean the shutter will be open for 1/60th of a second.
- A fast shutter speed (e.g. 1/1000) means the shot is taken quickly. Less light is let in, making movement/shakiness less of an issue.
- A slow shutter speed (e.g. 1/4) means that the shot is taken over time. More light is let in, making movement/shakiness likely to blur the shot.
Note: for general video, shutter speed should be about twice the frame rate (e.g. 30 frames per second = 1/60 shutter speed).
ISO
In the photography context, ISO (International Organization for Standardization) is a camera setting that will brighten or darken a photo. You can adjust the ISO to support the kind of shot you want.
ISO on this camera can be set to "Auto" or from 100-25600.

🎛 The main controls
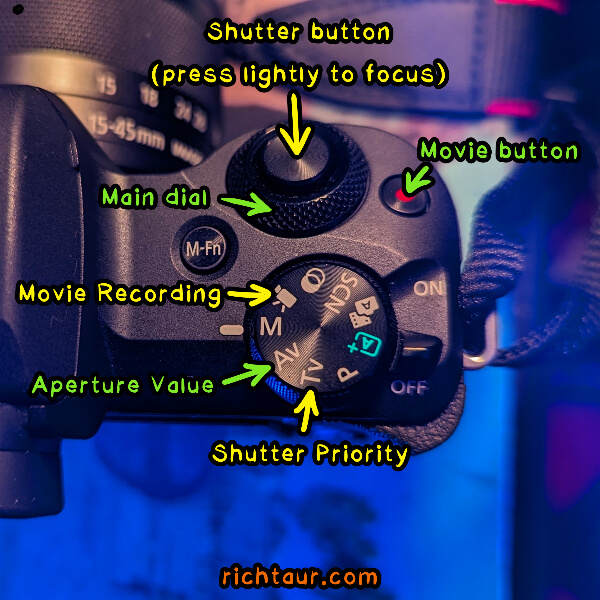
- Shutter button (take the picture)
- Main dial (immediate configuration)
- Power switch (on/off)
- Mode dial (switch capture settings)
- MENU button (advanced configuration)
You can always determine what the Main dial will affect. Look for the yellow "arch" icon (🔆️) that looks like sunrays. Turn the dial to change the value marked by the icon.
🎚 The Shooting Modes
Which Shooting Mode you're using is CRITICAL!
- [A+]: Auto Mode (intended for beginners)
- [A🎥]: Hybrid Auto Mode (beginners)
- [SCN]: Special Scene Mode (templates, sort of)
- [☽]: Creative Filters Mode (just for fun!)
- [🎥]: Movie Recording Mode (video)
- [M]: Manual Mode (for experts)
- [Av]: Aperture Value (prioritizes aperture)
- [Tv]: Shutter priority mode (prioritizes shutter speed)
- [P]: Program Mode (for experts)
When to use each one
With a few exceptions, I mostly use these three shooting modes:
- [Av]: Aperture Value: I use this for most shots because aperture (f-stop) determines how much light you're letting in. That's the main deal with photography! So I start with this mode & only switch if the situation is unusual.
- [Tv]: Shutter priority mode: I use this when a fast shutter speed is prioritized. For example: shaky hands, walking, running, riding.
- [🎥]: Movie Recording Mode: I use this for video so I have exact control over the video settings. (I don't like using the Movie button in other capture modes, because IDK what kind of video it'll create.)
📸 Taking pictures
- Select the mode most appropriate for your situation (start with Av).
- Adjust settings (e.g. focus, ISO) to get the shot you want.
- Press the shutter button lightly to focus.
- Press fully to shoot.
📹 Recording video
- Put the camera into Movie Recording Mode (🎥).
- Adjust settings (e.g. focus, ISO) to get the shot you want.
- Press the Movie button.
Auto Focus VS Manual Focus
Press the AF/MF button to toggle between Auto Focus and Manual Focus. I usually use Manual Focus, but Auto Focus is handy when you just don't want to worry about it.

⚙️ Recommended Settings
Here are the settings that I like to use. You probably have your own preferences! I really recommend writing them down (like this guide) to help you remember them.
- Menu / Display level / Menu display: Standard
- Menu / Display level / Mode guide: Disable
- Menu / Display level / Feature guide: Disable
- Menu / Set up (2) / Power saving / Display off: 30 min.
- Menu / Set up (2) / Power saving / Auto power off: Disable
- Menu / Set up (2) / Power saving / Viewfinder off: Disable
- Menu / Shoot (7) / MF peaking settings / Peaking: On
- Menu / Shoot (8) / Sound recording / Sound rec.: Manual
- Menu / Shoot (8) / Sound recording / Rec. level: (turn all the way down, then back up 1-5 based on your preference)
Note: press the MENU button to get into this, uh, menu. The upper-right shows the submenu you're in (e.g. "Shoot (8)").

😈 Trouble Shooting
A few ways to get good shots in difficult situations:
What to do when the shot is too bright
- First, do you have the camera settings you want? Double-check.
- Next see if an aperture adjustment makes sense. You can close it some to reduce brightness.
- Lastly, use ISO to adjust until you're happy.
What to do when the shot is too dark
- First, do you have proper lighting in place? You might want to add some lights or open a widow or something.
- Next see if an aperture adjustment makes sense. You can open it some to adjust brightness.
- Lastly, use ISO to adjust until you're happy.

📈 Advanced
So far we've covered enough to be able to capture photos or video in most situations. Here are some advanced tips:
Canon Camera Connect
There's an Android app, and it's good. The primary use cases:
- Take pictures without disturbing the camera
- Preview from a remote location
Note: I tried Bluebooth with no luck but Wifi worked great.
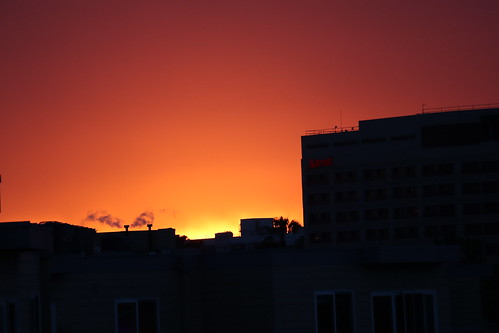
Pictures of the night sky
Don't be embarrassing like me:

Here are some tips for getting good night (or low light) shots:
- Put the camera on a tripod.
- Use Canon Camera Connect to take photos without disturbing the camera.
- Use MF (manual focus) & adjust until your subject is crisp & sharp.
- Open the aperture as much as possible (use the lowest f-stop you can set).
Shooting timelapse video
Use-case: baking cookies.
- Put camera into Movie Recording Mode (🎥).
- Menu / Shoot (1) / Time-lapse movie: (Scene 1-3 or Custom)
Shooting on an interval
Use-case: taking family photos.
- Put camera into Aperture Value (Av) mode.
- Menu / Shoot (1) / Drive mode: Self-timer:Continuous
Shooting slow motion
Use-case: capture something fast or make a moment feel more cinematic/epic.
- Put camera into Movie Recording Mode (🎥).
- Menu / Shoot (1) / Movie rec quality / High Frame Rate: Enable
Note: remember to revert to your previous settings when done with these special situations!
Taking portraits
Certain lenses make people appear more appealing to the eye or professionally photographed. For best results, try lenses in the range of 100-135mm.
That's it. This tip is hilariously terse because I have to write this down somewhere to remember it!
🔗 References

🏔 Closing thoughts
It is said that the best tools are the ones you make for yourself. I had already written a Google Doc to walk through all this stuff. It wasn't good enough though, because it was just for me, know what I mean? Messy & disorganized.
By publishing this guide, I had to raise the bar a little, double-check the info, and present it in a way that's more digestible. I almost turned it into one of my cheat sheets, but that was just me overscoping (again)! Keep it simple, folks.
game devs, beware the monster hunting you 🐉🎃 pic.twitter.com/Z6MxCJG8n1
— Matt Hackett 📙 (@richtaur) October 5, 2023
That's the guide! Usually I talk about video games or the making of them. This post about photography seems unrelated, but it isn't! If you follow my work you won't be surprised to hear that I'm learning more about photography to take photos & video for my game publishing company Valadria.
Soon photos will be playing a major role to support one of my games. Subscribe to the Valadria newsletter to see the photos when they're ready.
See you there!

Taken with my Canon EOS M50, naturally!
More here:
How has web dev changed in the last decade?